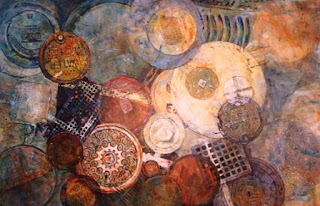
 This is my third GRATE painting. The first one, done nearly 10 years ago, was about 5 x 7 inches, the next 20 x 26 inches, with this one being 26 by 40 inches. It's been a while since I've had so much fun while painting a picture.
The whole process, from dodging traffic while taking photos of the man hole covers and grates - to the preparation and design - to the actual wonderful painting time, has been both challenging and exciting to do. Traffic actually stopped a couple of times on that cold rainy Sunday afternoon while I stood in the center turn lane taking photos of some really great grates. The cars could have gone around us, but the drivers were so polite and careful to wait for me. At another location, a man circled around to ask if we needed help. When we told him we were taking pictures for art, he moved on. Crazy artists! Thanks, Betsy, for driving, for stopping, for joining in on the fun.
Grates have fascinated me since childhood, when I was afraid to walk on them. I love the lines and edges, the lettering, the strength they have, and especially the patterns and textures that the paint and rust make. Some are really works of art in themselves. Now anywhere there's been a neat one underfoot, a photo is a must. In my studio you can find quite a photo collection of amazing grates.
One of my self imposed challenges for this painting was to create a design with circular shapes that allowed eye movement from shape to shape. Squares, equilateral triangles, and circles are predictable shapes that usually capture the viewer's eye, to the point of stopping eye movement in the painting completely. Using both value changes and color contrasts helped to create a flow throughout the painting.
The second challenge was to paint a more curvaceous painting. When painting, I always seem to prefer straight edges over curves, so doing the reverse could help me stretch a little. Somehow the challenges helped me stay directed.
I'm super pleased with the results. Sounds like a 'pat on the back,' but it's not. It just makes me very happy with how the painting turned out, and I really enjoy looking at it. It's almost as if it appeared on the paper magically, and I had little to do with it. (That's not true, of course, since there are more than 50 hours of work (play) in its actual creation.) Check the previous post on this blog for the work in progress of this grate painting. You'll see that several changes were made from that post to this finished piece.
Don't you LOVE textures? They are so incredibly inspiring and tantalizing. Artists HAVE to paint them, don't we? Since this is Fluid Acrylics on YUPO, creating amazing textures was just way too much fun. At first, my focus was on developing a good composition, then the textures were a blast to add after that was worked out.
It's been said that texture is the 'icing on the cake.' If the painting's a good one, people will want to get closer, then be surprised by the textures and details. If the painting has a weak composition, they may pass by it too quickly, and even the most wonderful textures in the world won't make them stop and look.
I really hated for this painting to be done. And the title is still undecided. GRATE JUNK - GRATE EXPECTATIONS - ROAD TRIP - UNDERFOOT - AMAZING GRATES - ETERNALLY GRATE FULL - TREAD ON ME - HITTING THE PAVEMENT...............


Here are photos of my other two grate paintings. The 'close up' grate is Watercolor on YUPO, and the Italian Grates are Fluid Acrylics on YUPO, completed about two years ago. Now for the next one!!!!!!!


